Showing posts with label Housework. Show all posts

Monday, August 12, 2013

"...And the end of all our exploring
Will be to arrive where we started..."
Our School Room 2013


We shall not cease from exploration 
And the end of all our exploring 
Will be to arrive where we started 
And know the place for the first time. 

     T.S. Eliot, "Little Gidding," Four Quartets

We are quickly approaching the start of our first "official" homeschool year, and that means we spent some time starting to get our school room organized.  However, we still have a lot to do (as you will see from the pictures).

We have an actual school room, which used to be the dining room we never dined in.  We converted it to an office a couple of years ago, and it has been a great space for us to do school in (albeit sporadically up to this point).  However, there are a few drawbacks to this room.  

First, one whole side is open to the entry way, which means there are only 3 walls of open space. Second, one of the other walls is mostly covered by the front window.


 So I have my desk up against part of this wall, and it sticks out over part of the window. We also have boxes of papers, a file box that I was using last year to keep SC's schoolwork in, and some other things that need to be gone through sitting in front of the window.  On the wall are my and AC's college diplomas, and that is pretty much all that fits in the little space on either side of the window.

The other drawbacks to this room are self-created, as I have covered the back wall and other side wall with bookshelves, which were mostly full before we moved school into the room, and are very full now.


We purchased a mobile stand-up whiteboard/bulletin board last year, and while expensive, it has been something we use daily for school.  Last year we had it as a separator between the room and the entry way, but it really was in the way of the front door, so I moved it in front of some of the bookshelves that are just holding all my old college books, and it is much more user friendly there.

SC has a little desk in the middle of the room, and we started using an exercise ball at the end of last spring, though right now the desk is covered with her summer art projects and supplies, and I have no idea where the ball went.

I have one bookshelf dedicated to the things we will be using this year, and it is mostly full, so I have no idea how I will organize for next year (because I tend to keep EVERYTHING).


I have a few shelves dedicated to art supplies, some of which are purposely out of SC's reach, and some that she has easy access to.  I also have some of last year's curriculum, my graduate work books, and all the books and notebooks from my one year of teaching mixed in.


Finally, I got some Command picture clips and turned our pantry doors into a calendar and artwork display area.  I started doing that last spring after I turned the whiteboard so the bulletin board side was not viewable 100% of the time, but I was using tape.  I got tired of going through so much tape, and honestly, I didn't want tape on some of SC's art that I want to save, so this is the solution I have come up with.


I really like these clips, and they are very easy to use.

So, I still have quite a bit of organizing to do; mostly just going through the things that have piled up, finding a place for them, cleaning off my desk and finding a place for all that stuff, but you should have seen it a few days ago.  The floor was littered with paper that SC had taken out and cut up, there were stacks of mail on her desk from when we were out of town that I had just dumped in a box to go through later.  I had MORE bags from Target/Hobby Lobby/Michaels/Mardel of supplies to start this year.  I had all of the curriculum I had purchased in a box on the floor in the living room.  I still have a few weeks before we start our year (the first week of September), so I am not worried!

Where do you do school (or homework) at your house?  Leave a comment, then check out other homeschool rooms at the 5th Annual "Not Back To School" Blog Hop.


**This post contains affiliate links.  Please read my disclosure statement.

Tuesday, June 18, 2013

Top Ten Tuesday:
"I didn't want normal until I didn't have it anymore."

"I didn't want normal until I didn't have it anymore."
― Maggie StiefvaterLament: The Faerie Queen's Deception

I am not typically one for branding or advertising, but I read a good list last week of ten things one family uses all the time and realized I might have a few helpful hints that I have picked up as I have grown up in the past ten years.  So, for Top Ten Tuesday this week, here are ten things we cannot live without in our house:


1. Electric Tea Kettle:  My in-laws gave us this tea kettle for Christmas this year and I don't know how we lived at all without one.  We use this on a daily basis for coffee in the morning and tea later in the day.  This one is very simple and it works great.

2. Mrs. Meyer's Laundry Detergent: This is the only laundry detergent we have found that will really get out the smell of urine the first time through the wash (if you have potty trained, you will know this is a must).  I have only ever used the geranium smell, and while it seems overwhelming when the clothes first come out of the wash/dryer, it is barely lingering when I pull them from the closet to wear.  They just smell clean.  I have read that some of the other scents will stick around for a long time and smell horrible, but I can attest this is not the case with this one. 

3. Greenling:  This is the local farm-to-consumer delivery service, and if you live anywhere in Texas, please check them out to see if they are delivering to your area.  They deliver local produce, meats, eggs and other goodies weekly, and their prices are comparable to those you would find at Whole Foods or Central Market.  For me, the nearest Whole Foods is almost an hour away, so having my "green box" delivered to my doorstep has been a huge gas-saving blessing.  They also give information about each of the farms/ranches that provides them with products so you can make an informed choice. You can shop by a pre-selected "local box" that changes weekly, or you can create your own box by choosing items individually.  They even offer "meal kits" for those short on time, complete with recipes.
Check out Greenling here.


*If you are not in Texas and/or Greenling does not deliver to your area, I urge you to seek out local farm co-ops and meat producers and give them a try.

4. French Press: We make coffee most mornings, but neither AC nor I drink it all day long.  This means that the typical 10-cup or 12-cup coffee maker is just too much for us.  We tried a Keurig machine for a while, but it was so much mess because we never really liked the coffee (or teas) that came already in a pod, so we had to use the pods where you pack it in yourself.  Eventually we just gave up.  We discovered a French press and are immensely happy now.  It is very simple to use, makes the perfect amount for a cup or two of coffee in the morning, is easy to transport the grounds out to the composter, and cleans up in the dishwasher.

5. Netflix: Before SC was born, and before streaming movies over the internet was a "thing," AC and I have had a Netflix account.  However, we no longer have the DVD account, and what I really love most about it now is that it will open into a split adults/kids section.  I can choose the kids version, SC could navigate it by the time she was 3 because it has a scrollbar at the top that is just pictures of recognizable characters, and it includes many of the PBS shows we like to watch (at the most convenient time for us).  We can also stream it on a phone or iPad anywhere we have WiFi, which has been great for eating up time in airports or other non-productive places that SC needs to sit still.  It has also been nice to catch up on shows AC and I like to watch, but not be glued to a set TV schedule every week.
Check out Netflix here.


6. Apple TV: We have had an Apple TV since they were first introduced, and it is an item we could not live without in order to stream music from the computers to the stereo speakers.  It has also been great, since SC was born, to be able to stream photos onto our large-screen television for viewing by family instead of having to all huddle around a 13" laptop screen.
Find Apple TV at Amazon's Apple Store Here

7. Canus Orange & Clary Sage Goat's Milk Soap: I will admit, I have always been a fairly stinky person.  I am pretty sure I got my dad's sweat/stink genes and it has been a long time coming where I feel comfortable when the 100 degree temps arrive in Texas.  However, about two years ago, I was doing research into essential oils, soap making, and deodorant making as a last-ditch effort to find products that really worked at getting me clean and controlling my body odor without using a ton of chemicals that would just cause other problems, I came across this soap at Whole Foods.  It has changed my life.  It is the only soap I have ever used (since I was a teenager at least) that I get out of the shower not already smelling myself.  I may have an oversensitive sense of smell (especially when it comes to my own body odor), but for as long as I can remember, I have always bathed, washed certain areas three or four separate times while in the shower, and stepped out only to rush to the deodorant and slather it on because I still could smell myself.  This soup is superb, does not dry out my skin, and the essential oils get rid of the body odor in a major way.


8. iPad Mini: We gave in around Christmas and bought a "family" iPad Mini and it has been a great purchase for the whole family.  SC gets to play a ton of cheap, educational games, AC gets to use it for some grown-up games, tracking travel and sports scores, and I have my recipe app on it that I use while cooking.  We do not have 4G on it, so we can only use the internet when we have WiFi and that has not been a problem at all.  Also, the size of the iPad Mini is perfect of SC to hold.  I think the larger one would be ungainly and would end up being dropped quite often.


9. Charcoal Grill & Smoker:  A few years ago for Fathers' Day AC got to pick out a new grill/smoker.  We had a gas grill but he really wanted to try his hand at smoking, specifically brisket.  After a few uses of the smoker and its subsequent grill attachment, we gave the gas grill away to a family member.  Though it seems like it may take longer to get a charcoal grill going for dinner, it really doesn't, and the exquisite flavor of a charcoal grill (and the mesquite wood we throw in) makes any extra work (the steps to start the fire) worth it.


10. PlayStation 3:  Last, but definitely not the least on this list, is our PS3, which has grown and changed in usefulness as media forms have grown and changed.  It is a gaming device (which both SC and AC use equally, if not often), but it is also a BluRay player and our Netflix and Amazon Prime streaming player.  Though we initially only purchased it so AC could play video games (pre-SC) and watch movies once in a while (before everything came out in BluRay), it has changed and grown as our family has.  At this point we have no plans to buy the soon-to-be-released PS4 and will probably hold off until the PS3 no longer works.


Obviously we are technology bugs over here, which I suppose is appropriate considering AC's job in the technology field.  What are some of the items that your family cannot live without?  Leave a comment and then check out some other Top Ten Tuesday posts here


Many Little Blessings


**This post contains affiliate links.  Please read my disclosure statement.

Thursday, May 30, 2013

Thankful Thursday:
"I got the blues thinking of the future ..."

"I got the blues thinking of the future, 
so I left off and made some marmalade.  
It's amazing how it cheers one up 
to shred oranges and scrub the floor." 
~D.H. Lawrence


This week I am thankful that AC fully supports my whims (though this one had been discussed before) and I got to paint the kitchen green over the long holiday weekend, in between celebrating SC's 5th birthday.  I had been in a bummer mood and for some reason, nothing makes me feel as good as the physicality of painting walls.  So, I told AC "you know, what would make me feel better would be to paint the kitchen."  He said okay, and we got a bucket of paint, a new brush (I always need a new brush) and roller cover and spent a few hours applying two coats of paint to the kitchen.  Next I need to recover the valence (not in the picture anymore) and construct new curtains, but I will have to wait until SC's summer classes start up in June.

I am also thankful that God has given us a beautiful, smart, happy little girl to love and raise. I am glad that we were able to celebrate her on Sunday as she turned five years old, and thankful that she has good taste in music as we are going to a concert to see some local bands like The Orbans (one of her favorites - and mine) and Fate Lions, as well as The Avett Brothers, instead of having a party.  What an awesome little girl we have!

 
What are you thankful for this week?  Leave a comment, and then check out some other Thankful Thursday posts here:

Thankful Thursdays Button
 

Tuesday, December 4, 2012

Top Ten Tuesday:
"Home is home, though it be never so homely."

"Home is home, though it be never so homely."
English proverb, 
reported by John Clarke, 
Paræmiologia (1639), p. 101.

Over the Thanksgiving holiday, we took the opportunity to use our days off (and AC actually being in town for the whole holiday) to work on creating a backsplash in our kitchen.  


Our house has an open kitchen and living room design that separates the two areas with a long bar-height countertop, which holds the sink, dishwasher and empty counter space on the kitchen side.  The space between the bar-height counter and the sink-height counter is covered completely with the same laminate that is the counter, which is great for the wet area of the kitchen.  However, perpendicular to this area, up against the outer wall of the kitchen is the rest of the countertop and the stove, and unfortunately, between this counter and the cabinets above is just plain wall, and after years of cooking (and splashing) on the stove, we decided we needed create a tile backsplash.

So, here are ten steps to create a tile backsplash.

1.  First, measure the area you wish to tile.  While you are doing this, decide what size tile would look best in the space and might be easiest to place.  Typically backsplashes are done with smaller, more decorative tiles, but plain subway tiles are very popular, and if you are crafty, you can even use both plain tiles and add a strip of decorative tiles strategically (though that may require more cutting).  The area we had to tile was just under eight feet long and between one and two feet in height, depending which part of the counter it was under, so we decided a smaller tile would probably look best.


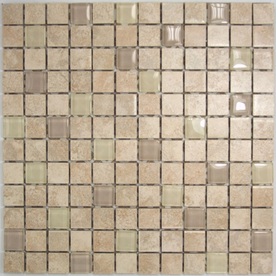
2.  Choose a tile.  We found this tile at our local home improvement store after looking both online and at other stores.  The color of the stone tile matches our countertop perfectly, and the glass tiles add just a little something without being too much in the small space.

3.  Gather your supplies.  
  • You will, of course, need the tile you chose.  Make sure you buy enough extra for cutting and piecing whatever pattern you want.  For example, the tile we chose has an "random" pattern with the glass tiles, so we needed to make sure we had enough to repeat that pattern depending on what we were cutting to fit at the top or the bottom.  For our just under ten total square feet, we bought twelve square feet of tile, which came in 12" x 12" blocks attached at the back with some sort of netting.
  • Some type of tile adhesive like Tile & Ceramic Adhesive
  • Grout in a color that matches the tile you chose.  You can use either the powder that you mix yourself like Polyblend Sanded Tile Grout or a premixed grout like Simple Premium Grout.  We used the premixed simply because we were doing such a small area of it, but we have read online that the powder is really very simple.
  • Caulking that matches the grout color like Polyblend Ceramic Tile Caulk - 10.5 Oz
  • A grout float like Grout Float
  • Tile trowel like 11-Inch by 4-1/2-Inch Notched Trowel
  • Grout sponge like Extra Large Hydra Tile Grout Sponge
  • Water
  • Clean, dry cloth
  • Tile nipper like Compound Tile Nippers (PRO)
  • Tile spacers like 1/8-Inch Tile Spacers, 200/Bag.  Make sure you get the size that you want to space your tile.  If you chose a tile like we did that already has space between the 12" x 12" sheets, make sure you get the same size spacers for between the sheets as is between the tiles on the sheet.
  • If you need to make large cuts, you will need a wet saw like SKIL 3540-02 4.2-Amp 7-Inch Wet Tile Saw.  However, for our tiny tile, AC said it was more likely that he loose a finger than cut the tile in the right place, so we only used the tile nippers for the few tiles we needed to cut down.

**At this point, if your walls are uneven, you may need to take an extra step or two to clean them up.  However, we did not have to do any of that, nor did we sand the wall to remove paint or have anything previously stuck to the wall that needed to be removed or holes patched.  You will need to remove outlet covers if there are outlets on the wall you wish to tile, and add outlet extenders like Quick Fix Electrical Spacers to the depth that the new tile will protrude from the wall.  You will also want to tape off and cover any counter that is showing with old newspaper or painters' paper.


4.  Apply the adhesive.  Use the tile trowel to apply a thin layer of the adhesive to an area of the wall that you will be able to apply tile to in about thirty minutes or less.  Use the teeth on the trowel remove excess and even out the adhesive layer.

5.  Apply the tiles.  Starting at a bottom edge of a prominent focal point, apply the tile over the adhesive, pressing firmly but not hard.  Make sure you get the tile set exactly where you want it the first time, because once it has been set in the adhesive, it is VERY difficult to move.  It will not slide into place, even a minimal amount, if you put it on crooked.  Put spacers under where the tile will set (we put them on the counter ledge), and make sure you put spacers around the edges of the tile before you place the next tile or sheet.


**From this point you will go back and forth between applying the adhesive and placing tiles until you have placed them all.  Do not forget to add the tile spacers in between.  When you get to the edges, around outlets or any other you will need to make cuts with the wet saw or tile nippers, and you may find it easier to apply the adhesive directly to the back of the tile.  After all the tiles have been placed, you may remove all the tile spacers, but if you forget, they will come out easily before you apply the grout.

6.  Apply the grout.  After the tile has set for 24 - 48 hours (depending on the instructions on the adhesive), you may apply the grout.  Follow the directions to mix the powder grout or simply apply the premixed directly from the carton.  It may be easier to scoop the grout with a simple trowel from the carton onto the grout float.  Holding the grout float at a 45 degree angle,  press the grout into the space between the tiles (joints), moving diagonal to the lines, working from the edges toward the center.


7.  Wipe down grout with a damp sponge.  After the grout has set for ten minutes (this is ten minutes from the first grout has been placed, not ten minutes after you are done), dampen a sponge and wipe up the excess grout from the surface of the tiles.  Some would suggest having a bucket to hold water in, because you will need to rinse the sponge between every wipe so as not to simply push watery grout around on the tiles, but doing it in the kitchen meant I just rinsed the sponge in the sink so that I was not constantly changing the water in the bucket.  This is where having two people might come in handy, as AC was able to continue applying grout while I (and even SC) came behind him to remove the excess.  You do not want the sponge to be so wet it is dripping water, as this will add too much water to the grout in the joints.  It needs to be barely damp.

8.  At least four hours later, use a tile scrubber to remove any lingering grout residue.  This tile scrubber is simply a sponge that has a slightly abrasive side (like Grout Scrub Sponge With Coarse Scrub Side), and on the tile we chose, the only residue remained on the glass tiles.  So, I dampened the abrasive side of the sponge and scrubbed lightly until the residue was gone.  Then I wiped the excess water away with a clean towel.

9.  Caulk the edges.  After the grout has set 18 - 24 hours, apply caulking to the edges between the tile and counters, outlets, etc.  This is eminently easier with a caulking gun.

10.  Clean up and enjoy!  Reaffix outlet covers, push the stove back into place, and put the things that live on your countertop back where they go.


Overall, this was an easy project, though definitely a two (amateur) person job.  I love the way it turned out, and would love to encourage anyone who is thinking about giving it a try that you can do it.

What small upgrade projects are you planning?  Leave a comment, and then check out more Top Ten Tuesday posts here:

Top Ten Tuesday at Many Little Blessings

**This post contains affiliate links.  Please read my disclosure statement.

Thursday, November 22, 2012

Thankful Thursday: "How Not to Have to [Wash] the Dishes"


This week, I am thankful that my daughter has been so helpful, as we have had so much going on lately and it has been hard for all of us to keep up with the housework, especially the dishes.  

Yesterday specifically, in the midst of trying to get the kitchen in order for all the last-minute baking we had to do, she pulled a chair up to the sink and started washing the dishes and loading them into the dishwasher.  I was amazed at how proficient she was at getting things scrubbed, and that she was careful with the glass pieces, asking for help to put them into the dishwasher so she didn't drop anything.


I am so proud, not only of how well she did, completely filling the dishwasher for us while I cleaned up the counter-tops, but also that she took the initiative in the first place.

What are you thankful for today?  Leave a comment, then check out some other Thankful Thursday posts here

Thankful Thursdays Button

Loved and Lovely
Related Posts Plugin for WordPress, Blogger...