Showing posts with label 2015/16 Projects. Show all posts

Tuesday, September 22, 2015

"...if you dress for it."
2015/16 Project #3
True Bias Mini Southport Dress w/ Lining


"You can have anything you want in life
if you dress for it."
-Edith Head

Last Saturday, SC's piano teacher hosted a "jam session" for the kids to practice playing with some other musicians.  SC picked "Take Me Out to the Ball Game," and practiced all summer.  She was very nervous at first, but after a few trial runs, she did a great job staying at a steady tempo so that the three others (guitar, bass, drum) could play along.  It was a neat experience.

For the performance, I decided to make her a new, fun dress.  She had previously picked out a leopard print cotton from the clearance table at Hancock, and after looking around a bit, I decided to make the Mini Southport Dress by indie designer True Bias.  The clearance table fabric was a very loose weave, making it very thin, so I changed the design to add a full lining for both the bodice and the skirt, but it was simple to do.  I chose a 100% cotton fabric in beige/nude that didn't allow any light through.


First, for cutting, I had to relocate my "helper."  Then, after comparing with SC's measurements, I decided to cut a size 8 at the shoulder and chest area, and then grade out to a 10 for the waist and skirt.  I also cut the pattern pieces for the bodice front, back and the skirt out of lining as well as the leopard fabric.

To make the lining, I basically followed the directions for the bodice twice, once with the leopard, and then once with the lining.  Then, when the directions called for using bias tape around the neck and arm holes, I simply followed those directions using the lining fabric, so that the wrong side of the lining faced the wrong side of the fabric.  When I got to the bodice placket area, I folded the leopard back as instructed, and then used that edge as a guide to cut the extra off with my serger.


Once the fabric was flipped appropriately, the lining fabric would lie inside the placket perfectly. On the neckline, I understitched all the way around, and made sure it was pressed crisp.  After stitching the armholes with right sides together, I had to pull the leopard fabric through the shoulder strap to turn it so that both right sides faced out, away from each other.  Then on the armholes, unfortunately since I was doing a full lining, I was only able to understitch as far back as I could cram my presser-foot, but it ended up being almost to the shoulder seam.  


I chose not to edgestich the neckline and the armholes because I didn't want the line.  Also, since I was doing a full lining and it would be attached at the waist, I would not have to worry about a bias tape flipping up.

The making of the button placket was very simple and the instructions were clear.  I did not have any problems figuring out how to get it to lay appropriately.  The skirt and it's lining were simple as well, just a straight seam up each side.  I turned the lining wrong side to the fabric wrong side, and then attached the waistband casing to the fabric right side, and then attached all that to the right side of the bottom of the bodice.  There was a lot of fabric, with two extra layers, but I finished the seam with the serger and after pressing, it was not as bulky as I thought it might be.

The hardest part of the entire project was making the ties.  Because the leopard fabric had such a loose weave, I had to be extra careful to not tear any of the yarn and leave a hole.  It took almost an hour to get the first tie flipped right side out, but for some reason only about fifteen minutes for the second.  It may be because I started using a wooden kebab skewer to press it through!


Actually threading the ties and elastic through the waistband casing was easy compared to flipping the ties right side out.

Finishing up the dress with a hem, I cut 1 1/2 inches off the lining bottom and finished the edge with my serger, and then did the hem up 1/4 inch, and then 1 full inch.

Here is the finished inside, where the full lining is visible, plus the button placket.


And here is the final dress, front and back ...


and in the rain!!


"We live in a web of ideas ..."
2015/16 Project #2
Seamwork Akita Top


"We live in a web of ideas,
a fabric of our own making."
-Joseph Chilton Pearce

I am new to the world of downloadable patterns, and I wanted something simple to try for my first one.  The "Akita" top from Seamwork magazine seemed perfect, as it is just one pattern piece.  The boxy, drapey style is also very much in fashion right now. 

The pattern was easy to print out and tape together.  However, the way it is supposed to fit on the body, with some definition around the bust, and then drape, would make it look like I was wearing a tent.  The size I was supposed to cut based on my bust measurement would leave a fifteen inch difference between my actual waist size and the finished waist size.  Instead, I decided to cut the front of the pattern from the back, perform a 2" Full Bust Adjustment (FBA), and then tape it back together and cut the size 8, matching my upper bust measure instead.


The splicing and spreading of the FBA was actually much simpler than I thought it would be, and since I didn't actually change anything on the shoulder area, it taped back together well.  Since it is just one giant pattern piece, I did not have a large enough table space to lay it out and cut, so I ended up using the floor and moving my cutting mat around.  This was also my first attempt at using pattern weights and a rotary cutter, and it is SO MUCH EASIER to go around curves than using pins and scissors.  I don't think I will ever go back!  However, it will be even better when our new house is finished and I have room for a large cutting table in my sewing and craft room.


I used a 100% rayon challis fabric I found on the clearance table at Hancock, as I thought the drape would look nice.  I essentially was going to make a potentially wearable muslin, and if I liked the fit and style, make another in a Girl Charlee rayon challis fabric that I have had in my stash for over a year.

Unfortunately, this boxy style just looks terrible on me.  While the top went together easily, it just isn't very flattering.  I attempted to add a sweater, but that didn't help.  What I really need is more definition at the waistline.  I think I may buy a white belt to see if that helps, but I am not sure it will ever look as cute as it does on the pattern model.  I am not sure the neckline will ever lay flat, either, though cutting the size at my upper bust measure should have fixed that.


All in all, it was a great, simple pattern to try my hand at printing, taping and using a downloadable pattern.  The instructions were clear, and on a different body shape, this might be a great top.

Friday, August 28, 2015

"Learn the rules like a pro ..."
2015/16 Project #1
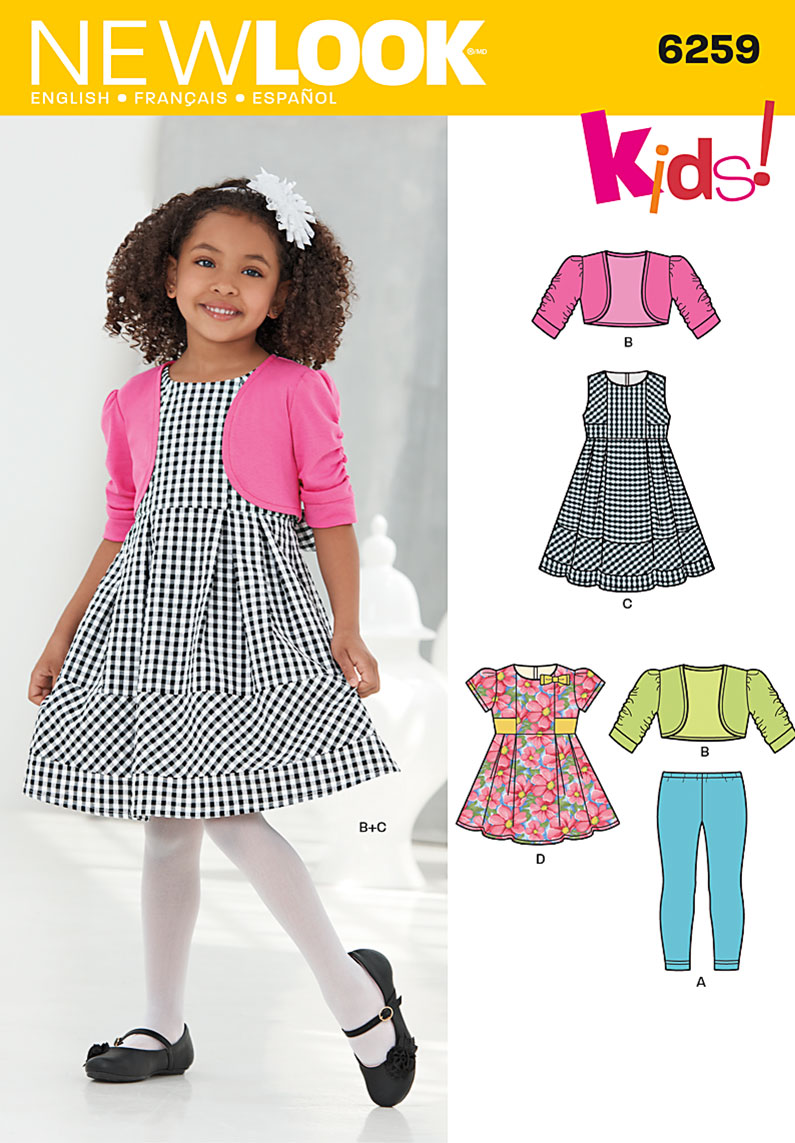
New Look 0959/6259 Dress


"Learn the rules like a pro, 
so you can break them like an artist."

-att. Pablo Picasso

A few weeks ago, when I was going through some of my previous pattern purchases (yay $1.99 sales) to see which project I wanted to start first once SC was back at school full time, I realized I had a few patterns which she is at the top size, and just barely even that.  Unfortunately, I also have fabric for some of these patterns that I had already purchased, and needing to size up would mean I didn't have enough fabric to complete the project.  Of course I could always just add that fabric back into my stash for something else, but just look at that super cute puppy fabric.  I decided a new dress for the first week of school would be project number one.

2015/16 Project #1:


For this project, I used view C, a sleeveless dress with the longer skirt.  This pattern has an interesting design, in which the the front side panels and middle skirt band are cut on the bias.  In the example, a check fabric was chosen, so it is very easy to see the bias design.  Here is a close-up of the front panels.


In my puppy fabric, there is a very specific one-way design.  I bought extra fabric in order to match this design; however, I did not buy enough fabric.  The middle skirt band being cut on the bias took up an enormous amount of space when cutting the fabric (see the bottom picture below), and I couldn't follow the placement suggestion because then the puppies would not be going in the same direction all the way around the skirt band.  I ended up with the bottom band having to be cut completely upside down in order to cram it onto the fabric with the curve!  Luckily, the puppies still look cute, and it works because the bias-cut puppies are tumbling.  I also cut the lining pieces upside-down because it fit better that way.


The pattern adds fullness with inverted box pleats (my favorite kind to make), four on the front and then four on the back.  


The pieces fit together perfectly, with only minimal attention to matching up seams and corners needed.  The instructions were simple and made sense.  The only part of the instructions I was unsure of was that it called for hemming the lower band before attaching it to the dress.  However, I did it that way anyhow, and now I think that the bulk of the dress and the skirt  already being attached would have hampered creating a straight, smooth hem.


I struggled a bit with the zipper, but that is because I need to practice zippers more.  I opted for an invisible zipper because I like the look of them more, but I either need to find a source for invisible zippers that offers something other than the typical Coats & Clark brand (which require a special zipper foot made by C&C, and I don't have one), or find that special zipper foot.  My own machine's zipper foot is just a few millimeter off, causing my stitching to be either too far from the zipper teeth, or directly on top of the zipper teeth.  Also, somehow in all of the drama trying to get it in, the back of the dress now doesn't line up perfectly, but it is so tiny that I am probably the only one who will notice.


Here is a close-up of the bow at the back, which went together perfectly, and is just the right size for this dress.


Finally, here is SC modeling her new dress before school today!  The fit is perfect (I cut a size 8), with no changes needed, even though originally I wasn't sure there would be quite enough room in the bodice.


I hope to make view A & B, the bolero and leggings, next week as projects #2 & #3, so she can wear them along with the dress as (fingers-crossed!) the weather eventually turns a bit cooler.

Related Posts Plugin for WordPress, Blogger...